Friday, July 20, 2012

Custom Cobra Sand Dragon- Work in Progress to Finished Piece

 Often, friends and other collectors ask me how I made something, what supplies I use, or how I painted one of my customs, and while I'm always happy to share tips and techniques, it isn't always easy to explain. I thought it would be fun to follow my progress on a custom and document it here.

This post will be a full progress "how-to" style article about my most recent custom, the Cobra Sand Dragon, a simple desert themed repaint of the Cobra Black Dragon.


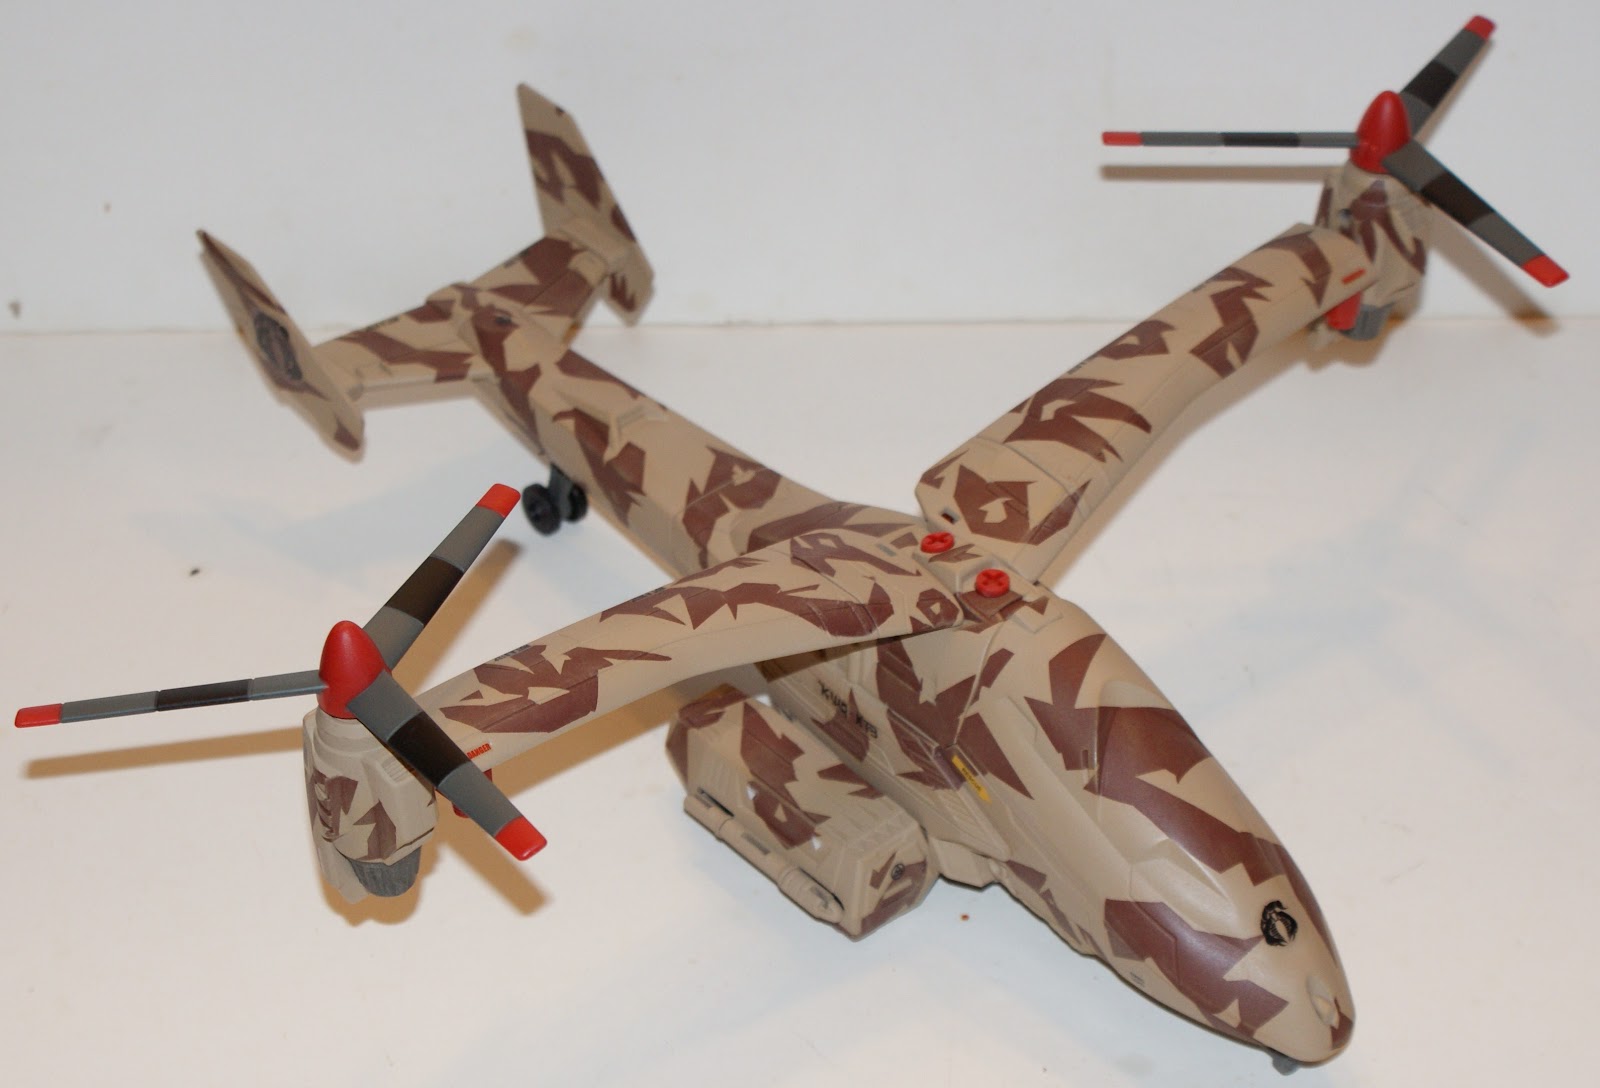
The Cobra Black Dragon is a "GI Joe: Renegades" animation based toy that was released in 2011 as part of the 30th anniversary line of 33/4" GI Joe products. In the cartoon, it was a large, high tech Osprey type aircraft, with seating for multiple people. The toy translation left a lot to be desired in terms of size, but captured the high tech look and feel of the Renegades animation very well. It only sat one figure, with the rest of the mass of the toy dedicated to spring loaded or button operated features. Unfortunately, even when you take the thing apart, there isn't a ton of room for crew or cargo conversion anyway, not without a complete overhaul, reworking and rebuilding. I wasn't looking to do all that. I liked the look of the Black Dragon and just wanted to change the feel of it, take away the techy looking lines and give it a more combat oriented role. I settled on a two color, desert splinter theme.


The paint I will be using is Rustoleum Rusty metal primer (chosen for the color, not the type of paint) and Krylon Camo Sand. Using the Krylon Sand is really a treat for me, because up until last year, I couldn't find it anywhere in my area. I ran into a full case at a Wal-Mart, in the clearance aisle, and grabbed every can. Finding a good sand colored paint isn't easy, many customs I have done used Tamiya Desert Sand which gets VERY expensive for larger pieces.

As I mentioned, the Dragon is a complicated mess of spring loaded features on the inside, and once disassembled, has a ton of parts. The first thing I do it split the pieces into two groups, the parts I am painting, seen here, already cleaned, sanded and prepped for painting.


And then the pieces I am not painting, shown here. There are a lot of moving parts on the Dragon, to allow for the tilting rotors, the spring back wings, and the bomb and cannon releases. Also, many of the parts are a tight fit. Even though they are cast in red, a color not traditionally associated with a desert scheme, I decided to leave them unpainted, along with the grey accessories, to make reassembly easier and retain the functionality without gumming up the tightly fit parts with excess paint.


The dominant color will be sand, with a sharp, reddish brown splinter pattern over it. So I start by laying down a coat of brown on all the most visible surfaces, careful not to over apply it in areas with joints or moving parts. This paint is meant to be used as a rusty metal primer, so I am a little unsure of how it will work with plastic. Also, it is a very flat, dry paint, so care must be taken when applying it because it tends to build up in some areas with a coarse, almost dusty texture. Luckily, it went on easily, and I allowed a day for it to dry due to the high temperatures and humidity in my area this time of year.


The next step is to mask off the pattern, the areas that will stay brown after the main color is applied. I use blue painters tape, lay it down on an x-acto cutting board, and cut the individual shapes out one at a time. Like I mentioned, I am shooting for a pointy splinter scheme, it will offset the sleek lines of the dragon body nicely. I have done this many times, so I just cut the shapes out by hand with no reference or ruler, but someone who isn't used to doing this may want to have some photos on hand to keep their shapes similar and somewhat uniform in feel. One problem I frequently run into when I am doing this is that I intentionally start out making the shapes somewhat simple, but they slowly become more complicated as I go along, and I have to step back and look at the piece every few minutes to make sure the scheme is uniform in feel, scale and shape.


After the mask is applied, making sure every piece is as tightly affixed as possible in corners and over detail areas, I like to give the whole thing a light coating of matte finish clear coat to help seal up any areas that might allow the colors to bleed when next coat is applied. After that dries, I apply the Sand color over every piece.


When the top coat is dry, I carefully start removing the mask to reveal the brown color underneath. Normally this is pretty painless and the look of the model really starts to take shape, but sometimes an issue arises. Here, you can see the mask pulled up all the paint on one of the small rear wings.


With some of the modern plastics used in toys, no matter how much they are prepped, cleaned, sanded, or primed, you can still have an occasional adhesion issue. I've had it with every type of paint or primer at one times of another. There are several ways to fix a problem like this once it happens. Personally, I like to avoid brushing paint over sprayed areas just because it will always stick out to me, so I will try to remask it and spray it again as easily and painlessly as possible. Since the painters tape tore up the paint last time, I try something a little weaker-post it notes.


Yes, it looks ridiculous, and yes, they are not water tight, but all they have to do is shield the area I don't want to paint. I mask off the area and decide to go over it with sand instead of trying to rebuild the brown area that came off with the tape. I spray several light coats, and while it is still drying, I peel off the post it notes. If you allow it to dry for too long, it could penetrate the paper and permanently adhere to the piece, which would require serious repair later.


Here is the result. Not perfect, but certainly better, and after some finish work, it will be barely noticeable.

After removing all the masking, I take a high grit sandpaper, 400 or higher, and lightly buff over the entire piece. This removes any small instances of paint build up around the masked areas, so there isn't a noticeable "lip" from one color to the next.


With the mask removed, the full camo scheme is revealed. I decided to give the entire piece a light drybrushing with Tamiya Buff, a sandy color, to give it a light weathering and offset some of the lines and edges of the plane against the camo. I also painted the seat, engines and vents with a metallic gray. Afterwards, all the parts were clear coated with matte finish, and as that dried, I slowly assembled the pieces, reinstalled all the spring loaded weapons, screwed all the joints into place, and did some additional dry brushing to fix any differences in color from part to part after assembly.


The final step was to apply decals, and finish with a light coating of matte finish to dampen the gloss of the decals. The decals were taken from assorted sheets I have collected over the years, from places like Cobrastickers.com, or from retail vehicles, or in the case of the awesome Desert Scorpion Cobra I used for the rear wings, from another awesome customizer named Bryan who goes by the handle "Chickenbroth" on Hisstank. He had a chance to have a few decal sheets made and was kind enough to include me in the deal. I've just been waiting to use them for the right project, and this was it. Thanks Bryan!

Here are the pics of the finished project, the Cobra Sand Dragon, taken today. While this is a modern era GI Joe vehicle and is meant for use with the modern era figures, I threw the scene together some vintage style custom troopers by Black Major, because that is mainly the format that I collect.


Thursday, May 31, 2012

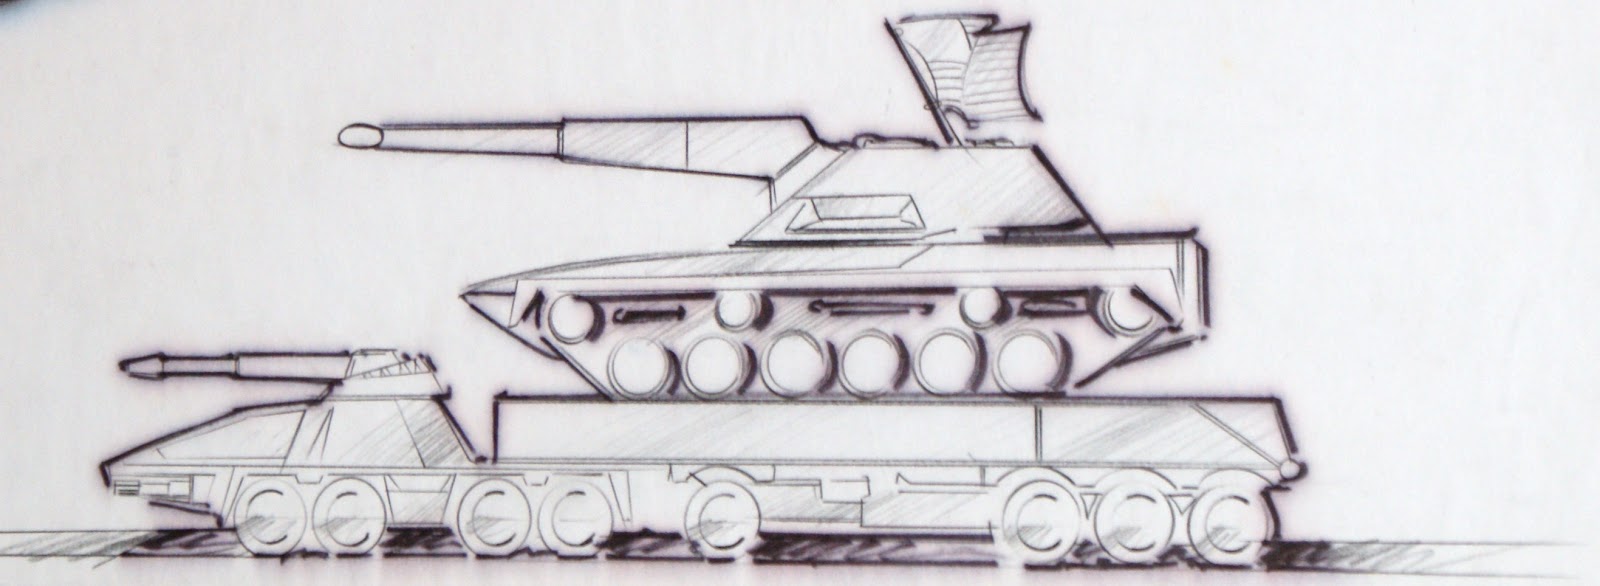
Unused Vehicle Concept Art- GI Joe Armored Transporter

When I started this blog, I mentioned that I would be showcasing some of the rarer items in my collection, like prototypes or pre-production artwork. Here is the first such entry, some presentation artwork for an unused vehicle concept, a GI Joe Armored Transporter. It was vehicle that would have been used to transport equipment, like tanks, etc.

Presentation Artwork was a stage in the design process of GI Joe toys where new ideas were shown at line meetings in the form of artwork or sketches. A designer would "present" the idea for discussion and approval by assorted department heads, marketing, etc. While we got many great figures and vehicles out of the vintage GI Joe line, there were many, many more things that didn't make it past the initial stages of art or prototyping, and only exist as rough representations of the designer's concept. This is the case with the Armored Transporter.

It was first designed and presented in 1985, for potential release in 1986. When it wasn't used, the designer pitched the idea again at a later meeting, but again, it didn't make the cut. As such, there are two finished renderings that exist for the concept, both of which I have here. This is the earlier piece, dated 1985, with most of the original Hasbro Confidential logo intact. Please bear with me as far as the pictures go, I am still working on my photography skills, and had a tough time with the flash on these. The art is pencil and marker on vellum, taped to presentation board, with a decal for the GI Joe logo.

The second image shows the full piece, with the title and Hasbro logo. In 1985, the GI Joe line still had a somewhat realistic military feel, and this concept was a definite extension of that. It had a very real world feel to it, a common sense, articulated military transport, with a cab and a trailer, that could defend itself via hidden cannons and rockets inside the flatbed if needed. It is shown hauling a Mauler tank, which gives us a good idea of the size that this would have been.
The smaller sketch at the bottom shows what the transport would have looked like in "deployed" mode.
This is the title and logo, I find it amusing that Hasbro kept a supply of the Viper and falcon glider stickers on hand for uses like this.
This is a close up of the Hasbro Confidential logo. The top of it was torn off, unfortunately, but you can clearly see the date and the in house identification numbers. Each piece of art was normally signed by a designer and a witness.
Here are a few more shots, like I said, I was having a tough time getting a good pic so I took several angles and close ups.

The second piece of art is basically the same, the color had changed and there were some subtle differences, but the main concept was unchanged. There is not a Hasbro logo on this one, possibly because there was already an established project number for it? I don't know.
Here is an angled shot, you can see the rocket launcher is much larger on this one.
One thing I find interesting is the reversal of the representation of modes in this second piece, showing the more action oriented "weapons deployed mode" in color with the secondary sketch illustrating the more practical "transportation mode". Perhaps marketing didn't appreciate the transport aspect over the combat mode? The increased size of the rocket launcher could have been a marketing suggestion, as well. designers were frequently told to make things "bristling with guns and missiles" for greater action and playability.

Regardless, I think we really missed out on a cool piece here. It would have fit nicely in with the 1985-86 line of vehicles, interacted with the established Mauler, as well as providing a practical military vehicle in the same vein as the Bridgelayer or APC.

I've never shown this on line, and not many people outside of a close circle of friends have seen it. This is my first real "reveal" on this site, and as such, I would greatly appreciate no one stealing the pics (yes, I am asking nicely, and I am hoping I won't be sorry later for not watermarking everything before posting). But please, feel free to link to this blog. I am really trying to get something going here, and I have a lot more stuff I can show if things go smoothly.

Friday, May 25, 2012

GI Joe scale Processed Plastic Army Troop Transport Truck

This could be cool, it could be nothing special, but I haven't seen it before, so I am writing about it. It is a 33/4" GI Joe scale Army Truck from Processed Plastic Company of Montgomery, Illinois. The company has been around forever, and still produces a ton of stuff that most of us wouldn't notice, unless we were looking to buy something for a 6 year old. They are probably best known (at least by me in my toy collecting circles) for producing the best small scale (1/35th or so?) army men and vehicles from the 1960's to the 1990's

Honestly, I never thought there was much of a collector market for those little army guys. I didn't even think there was any single well known company that made them, since most of the ones I see are just dollar store, "Made in China" junk. I only learned about them in the last couple years, from a friend who collects them. Do an eBay search for Processed Plastic Army men and you'll see a wide range of items and prices for examples in all conditions. I've sold a few that went for way more money than I expected, for sure.


Which brings us to this piece, a 1/18th scale (certainly closer than most Joe vehicles) cargo truck. I remember seeing a lot of grocery store and discount chain blow-molded junk when I was growing up that was meant for use with GI Joe or Star Wars, but I have never seen this before. I got it recently in a lot of older GI Joe vehicles and figures, from the 1980's. It has the same look and feel of the "Army Men" style plastic, but feels sturdier, with metal axles and hard plastic tires. There are decals to represent the headlights and front grill, as well as some details like the classic Army star on the hood and some generic military looking numbers and US CONVOY markings. It is well detailed, with rings in the bumper, a trailer hitch, and a nicely detailed cargo tent.

I mentioned it to a friend who collects Processed Plastic military stuff, and he had never heard of it or seen one. He doesn't even remember much PPC stuff in the Joe scale, (save for a large tank which looks to still be in production) and he has looked for several years both at shows and on line.


 Right off the bat, it is pretty obvious that it was made to hold figures, whether it came with some of it's own or it was made for use with other military lines. GI Joe figures need to sit sideways a bit because their feet are a little long to fit in front of the seat, otherwise they drop right through the hole in the roof with ease.

 Here is a shot from behind, with the cargo tent still attached.


Removing the cargo tent shows dual rows of seats that, while simple, fit a seated Joe figure perfectly, the side clips holding the figures tightly in place. It holds eight figures, and apparently had a flip down door that this one is missing. The tent attaches firmly with snapping clips.


The under carriage is more detailed than I expected, and the center is marked with the name of the company. It is nice to see "Made in the USA" stamped on it, too.

While it isn't a licensed piece and wasn't made to Hasbro's ARAH line standards, it certainly has a nice feel, heavier and sturdier than I would have expected. I have no clue exactly when it was produced, my buddy says the company either went under or stopped producing around 1982, but being that they are still around, I am not sure how accurate that is (and I am too lazy to wiki it right now). I have to say though, the feel, the style, and the look are unmistakably vintage, and fits nicely with the first couple years of the Joe line. It also represents an interesting "missing link" between the classic Army Men and the GI Joe line of the 1980's. It is a fun piece, and while the Joes had their APC, I can imagine running Cobra down in one of these, or maybe using it to transport some ammo crates or roll in a convoy (honestly, if this piece was ever available in black or blue, it would be THE BEST Cobra truck).

Tuesday, May 1, 2012

Final update on the HAZARD project

So, when I said "All I have left is X,Y, and Z" the other day, well, those were the most labor intensive parts. First up, I finished laying the black paint in the armor lines of the canopy. The purpose here was too show off the canopy's detail, and break up the overall orange in a critical place.
I used a small brush to lay down a thin bead of watered down black paint in each indented line, then wiped off the excess. There was some clean up necessary, because the black paint dried quickly, or stained the orange, so i had to buff it out and apply another few light coats of orange to cover it. It faded the black lines slightly, but they still stand out.

That left the treads, which had already been painted orange in the key armor areas, then masked so the tread and bogey areas were still visible, then sprayed black. They were then masked a second time to leave only the bogey areas exposed, as seen below. A metallic charcoal was applied lightly to the bogey areas, the same color used for the cannons. Both of them will be dry brushed with bright silver to bring out the details.

This left dry brushing and of both the treads and the cannons, and touching up of the orange and black wherever it bled. I'll admit, I got an orange brush on paint that was as close as possible to the krylon color of the tanks, but it doesn't match, and shows in some places on the armor plates of the treads, but I think the blemishes that it covers up looked far worse.


I had to power through the clear coating, because the weather was just not cooperating with me. To get the best results with the matte finish clear coat, there needs to be little to no humidity, and of course it rained all last night and then the temp rose to 80 over the coarse of the day, so conditions weren't optimal. I tried to offset this by using a hair dryer to dry the clear coat quickly and avoid the coat getting cloudy. So i was running outside, spraying each piece, then running inside to blow it dry. And it was past midnight. I'm not very popular among my neighbors.

That is it for the painting labor. Tomorrow I start assembling and stickering them, and there will be finished pics posted on Hisstank.com and Facebook.